

Warning: Before you go ahead with any of the steps below, make sure you already have a Time Machine backup that was made prior to installing macOS Big Sur. If you don’t have a backup, you will not be able to downgrade, and doing this will simply result in permanent loss of data since you’ll be formatting or erasing your drive during the process.
Apart from that, if you have any important data or files that you created after updating to macOS Big Sur, you’ll need to manually transfer them to an external drive since this data won’t be restored from the Time Machine backup. Once again, do not proceed if you don’t have a backup.
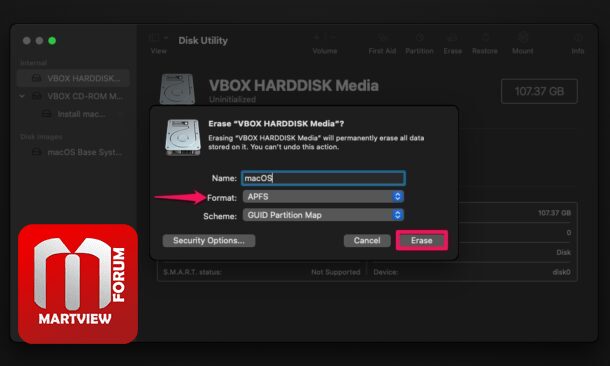
5. Now, select the disk drive where macOS Big Sur is currently installed from the left pane and click on “Erase” as shown in the screenshot below.
6. This will bring up the format options for the drive. Enter a preferred name for the drive and then choose the file system format as either “Apple File System (APFS)” (if you’re using a Mac with Solid State Drive) or “Mac OS Extended Journaled (HFS+)” (for Macs with mechanical and hybrid hard drives). Now, click “Erase” to confirm and format your Mac – THIS ERASES ALL DATA ON THE DRIVE, so don’t do it unless you’re absolutely sure that you have a backup!
7. Once the drive is successfully formatted, you’ll see the following screen. Click on “Done” and exit Disk Utility.
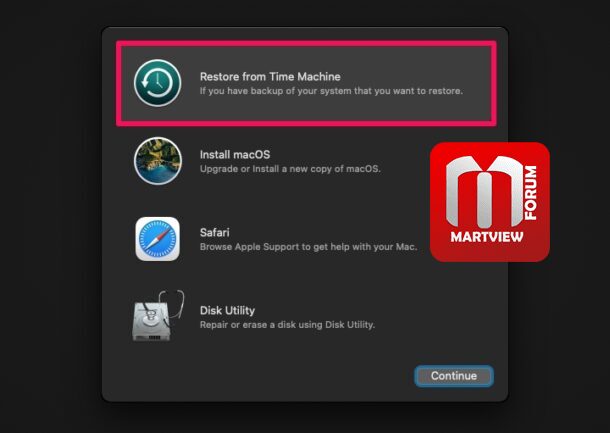
8. Next, choose “Restore from Time Machine” from the macOS Utilities menu.
9. You’ll be shown a brief description of this procedure. Click on “Continue”.
10. Now, your Mac will start searching for available backups. Choose the Time Machine drive that’s connected to your Mac as the Restore Source and click on “Continue”.
11. In the “Select a Backup” screen, choose the most recent backup from the macOS version you want to downgrade to. Next, select the name of the destination drive to restore the Time Machine backup of macOS to. This should be the same drive that we just formatted completely in Step 7. Now, click “Restore” to begin restoring the Time Machine backup to the selected drive.
That’s it. Now, you just need to patiently wait until the whole process is complete.
Apart from that, if you have any important data or files that you created after updating to macOS Big Sur, you’ll need to manually transfer them to an external drive since this data won’t be restored from the Time Machine backup. Once again, do not proceed if you don’t have a backup.
- First of all, connect the Time Machine drive to your Mac. This drive should contain the backup of your Mac that was made prior to macOS Big Sur installation. You’ll be restoring your data from this drive.
- Now, reboot or restart your Mac. To do this, click on the Apple logo from the menu bar and choose “Restart” from the dropdown menu.\
- When your Mac reboots, immediately press and hold down the Command + R keys to boot your Mac into Recovery mode.
- Doing this will take you to the macOS Utilities screen. Here, click on “Disk Utility” to get started.

5. Now, select the disk drive where macOS Big Sur is currently installed from the left pane and click on “Erase” as shown in the screenshot below.

6. This will bring up the format options for the drive. Enter a preferred name for the drive and then choose the file system format as either “Apple File System (APFS)” (if you’re using a Mac with Solid State Drive) or “Mac OS Extended Journaled (HFS+)” (for Macs with mechanical and hybrid hard drives). Now, click “Erase” to confirm and format your Mac – THIS ERASES ALL DATA ON THE DRIVE, so don’t do it unless you’re absolutely sure that you have a backup!
7. Once the drive is successfully formatted, you’ll see the following screen. Click on “Done” and exit Disk Utility.

8. Next, choose “Restore from Time Machine” from the macOS Utilities menu.
9. You’ll be shown a brief description of this procedure. Click on “Continue”.

10. Now, your Mac will start searching for available backups. Choose the Time Machine drive that’s connected to your Mac as the Restore Source and click on “Continue”.

11. In the “Select a Backup” screen, choose the most recent backup from the macOS version you want to downgrade to. Next, select the name of the destination drive to restore the Time Machine backup of macOS to. This should be the same drive that we just formatted completely in Step 7. Now, click “Restore” to begin restoring the Time Machine backup to the selected drive.

That’s it. Now, you just need to patiently wait until the whole process is complete.
Post helpful Like button
